How to Change a Light Bulb in a Kitchenaid Microwave?
If your Kitchenaid microwave is in need of a new light bulb, don’t worry – changing it is a quick and easy process. All you need is a new light bulb (preferably the same wattage as the old one) and a screwdriver.
- Open the microwave door and unscrew the light bulb cover
- Remove the old light bulb and insert a new one into the socket
- Screw the light bulb cover back on
- Close the microwave door
KitchenAid Microwave Light Bulb Replacement Part W10886919
How Do You Change a Lightbulb in a Kitchenaid Microwave?
If your Kitchenaid microwave has a burnt out lightbulb, don’t worry – changing it is a quick and easy process! Here’s what you need to do:
1. Unplug the microwave from the power outlet.
2. Remove the glass cooking tray and any other items from inside the microwave.
3. Locate the screws that secure the light cover in place. There will be two screws, one on each side of the cover.
4. Use a Phillips head screwdriver to remove these screws, then carefully remove the light cover.
5. Take out the old lightbulb and insert a new one in its place (make sure it is screwed in tight!).
6. Replace the light cover and screw it back into place using your screwdriver.
How Do I Change the Lightbulb in My Integrated Microwave?
If your microwave has an integrated lightbulb, it is most likely designed to be changed by the user. To do this, first locate the lightbulb cover. This is typically located on the ceiling of the microwave, near the back.
Once you have found the cover, unscrew it and remove it. With the cover off, you should be able to see the lightbulb itself. Simply unscrew the old lightbulb and screw in a new one.
Be sure to use a bulb with the same wattage as the old one. Once you have replaced the bulb, screw the cover back on and you’re done!
How Do I Change the Light in My Mounted Microwave?
If your mounted microwave has a light that needs to be changed, follow these steps:
1. Remove the screws that hold the microwave to the mounting bracket.
2. Pull the microwave down from the bracket.
3. Locate the light bulb at the top of the inside of the microwave.
4. Unscrew the old light bulb and screw in a new one.
How Do I Change the Lightbulb in My Kitchenaid Mixer?
Assuming you need to replace the light in your Kitchenaid mixer:
To do this, first identify which model of Kitchenaid mixer you have as the process differs slightly between models. Consult your user manual for specific instructions if needed.
In general, however, the following steps should work for most models.
Start by unplugging your mixer from the outlet. Next, remove the screw that holds the lens cover in place on the bottom of the mixer.
Once the cover is removed, twist and pull out the old light bulb. Replace it with a new one of the same wattage and type (usually an incandescent A15 appliance bulb).
Reattach the lens cover and screw it back into place.
Finally, plug your mixer back in to test that the new light bulb is working properly.

Credit: www.pinterest.com
Kitchenaid Light Bulb Replacement
If your Kitchenaid mixer light has burnt out, don’t despair! Replacing the light bulb is a simple process that only takes a few minutes. Here’s what you’ll need to do:
1. Unplug your mixer from the power outlet.
2. Remove the bowl from the mixer.
3. Locate the light socket on the underside of the mixer head.
4. Using a small Phillips screwdriver, remove the two screws holding the socket in place.
5. Carefully pull out the old light bulb and insert a new one in its place (we recommend using an LED light bulb for energy efficiency).
6. Reattach the socket and screw it in place snugly but not too tightly – you don’t want to risk stripping the threads.
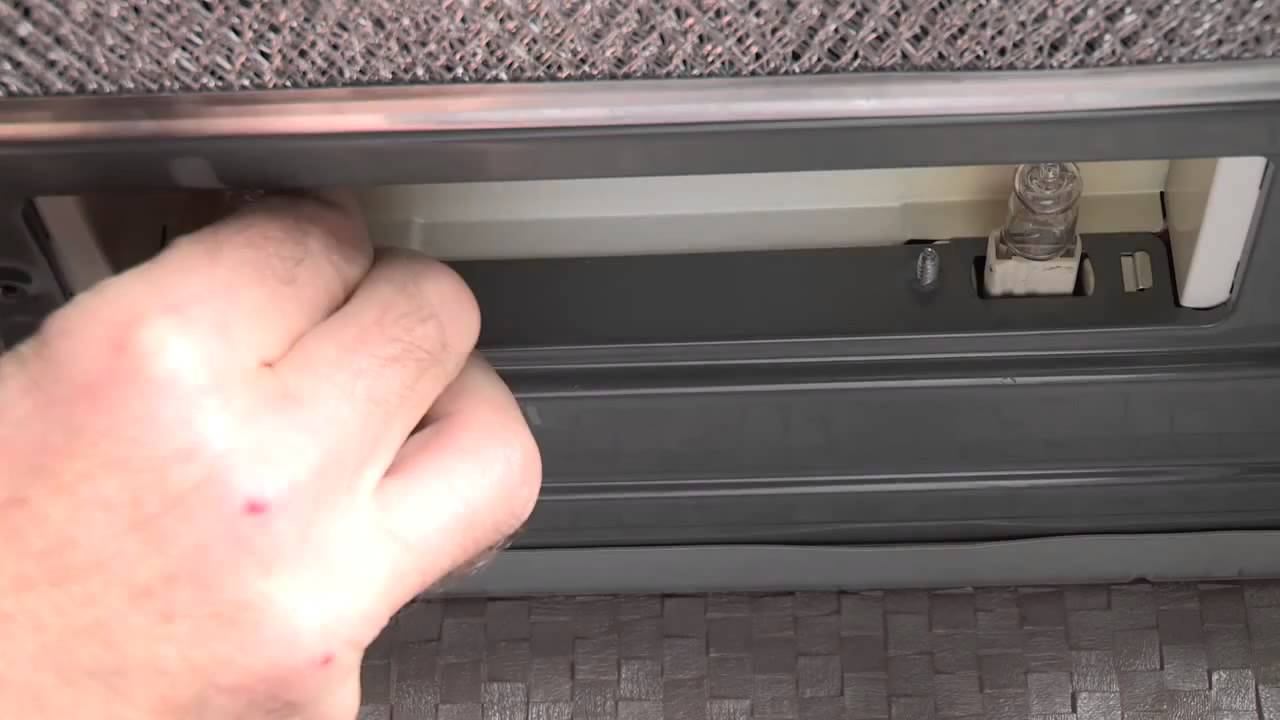
Kitchenaid Microwave Light Bulb
If your Kitchenaid microwave is in need of a new light bulb, follow these easy steps to replace it. You’ll need a Phillips head screwdriver and a new 40-watt incandescent light bulb.
First, open the microwave door and locate the two screws that hold the glass cooktop in place.
Remove these screws with your screwdriver and set them aside. Carefully lift the cooktop up and out of the way, being careful not to disconnect any wires.
Next, locate the metal plate that covers the light bulb.
This plate is held in place by two small Phillips head screws. Remove these screws with your screwdriver and carefully remove the plate.
At this point, you should be able to see the light socket andbulb .
Use your fingers to twist the bulb counterclockwise until it comes loose fromthe socket . Pull the old bulb out ofthe socket and dispose ofit .
Now take your new light bulb and insertit into the socket , again twisting it clockwise until it’s tight.
Replace the metal plate overthe Bulb , making sure that all wires are still connected, then screw it back intoplace using your screwdriver .
Kitchenaid Microwave Light Not Working
If your Kitchenaid microwave light isn’t working, there are a few things you can check to try and fix the problem. First, make sure that the light bulb is screwed in securely and that there is no debris or dirt blocking the light socket. If the socket is clean and the bulb is screwed in tight, try resetting the circuit breaker for your kitchen.
If that doesn’t work, you may need to replace the light bulb itself.
How to Replace Light Bulb in Built-In Microwave
If your built-in microwave needs a new light bulb, don’t despair! Replacing the light bulb is a relatively easy task that you can do yourself in just a few minutes. Here’s how:
1. First, unplug the microwave from the power outlet.
2. Next, remove the glass cooking tray and any other items from inside the microwave.
3. Locate the screws that secure the light cover to the top of the microwave cavity.
Use a Phillips head screwdriver to remove these screws (there may be 2 or 3).
4. Carefully remove the light cover and set it aside. Be careful not to touch the glass portion of the light bulb with your bare hands, as this could cause it to break.
5. Grip the base of the burned-out light bulb and twist it counterclockwise until it comes loose from its socket. Pull out the old bulb and dispose of it properly.
inserted into its socket 6 .
Kitchenaid Microwave Kmhs120Ess Light Bulb Replacement
If your Kitchenaid Microwave Kmhs120Ess light bulb burns out, you’ll need to replace it. Here’s how:
First, unplug the microwave from the power outlet.
Then, remove the screws that hold the light cover in place. After that, twist out the old light bulb and screw in a new one. Finally, reattach the light cover and plug the microwave back in.
That’s all there is to it! With just a few simple steps, you can have your Kitchenaid Microwave Kmhs120Ess light bulb burning bright again.
How to Change Light Bulb in Thermador Microwave
If your Thermador microwave’s light bulb burns out, you’ll need to replace it. Here’s how:
1. Unplug the microwave from the power outlet.
2. Remove the screws that hold the plate in place over the light bulb.
3. Carefully remove the plate and set it aside.
4. Use a screwdriver to loosen and remove the burned-out light bulb.
5. Insert a new light bulb into the socket and tighten it in place with the screwdriver. Be careful not to touch the glass of the new bulb with your fingers, as this can cause it to break prematurely.
Kitchenaid Cooktop Light Bulb
If your Kitchenaid cooktop light bulb has blown, don’t despair! Replacing the light bulb is a relatively easy process that you can do yourself in just a few minutes. Here’s what you need to know:
First, locate the cooktop light bulb cover. This is usually located near the front of the cooktop, near the control panel. Use a Phillips head screwdriver to remove the two screws that hold the cover in place.
Once the screws are removed, carefully lift off the cover. Behind it, you’ll see the light bulb and its socket. Using a clean cloth or paper towel, gently twist the light bulb counterclockwise until it comes loose from the socket.
Now it’s time to insert the new light bulb. Make sure it is an identical replacement for the old one (check both wattage and base type). Inserting it into the socket, again twist gently clockwise until tight.
Finally, replace the cooktop lightbulb cover by lining up the two holes withthe screws and tightening them back in place with your Phillips headscrewdriver. That’s it – you’re done!
How to Change Light Bulb in Cuisinart Microwave
If your light bulb burns out in your Cuisinart microwave, don’t panic! It’s actually a pretty easy fix. Here’s what you need to do:
1. Unplug the microwave from the power outlet.
2. Remove the glass plate from inside the microwave (be careful, it may be hot).
3. unscrew the light bulb cover from the ceiling of the microwave.
4. Pull out the old light bulb and screw in a new one (of the same wattage).
5. Put everything back together and plug in your microwave.
6. Turn on the power and test out your new light bulb!
Conclusion
If the light bulb in your Kitchenaid microwave has burned out, don’t worry – changing it is a quick and easy process! First, locate the screw that holds the light cover in place. Once you’ve unscrewed this, carefully remove the cover and set it aside.
Next, use a pair of needle-nose pliers to unscrew the old light bulb from its socket. Be careful not to touch the new bulb with your bare hands, as this can shorten its lifespan. Finally, screw in the new bulb and reattach the light cover.
That’s all there is to it!