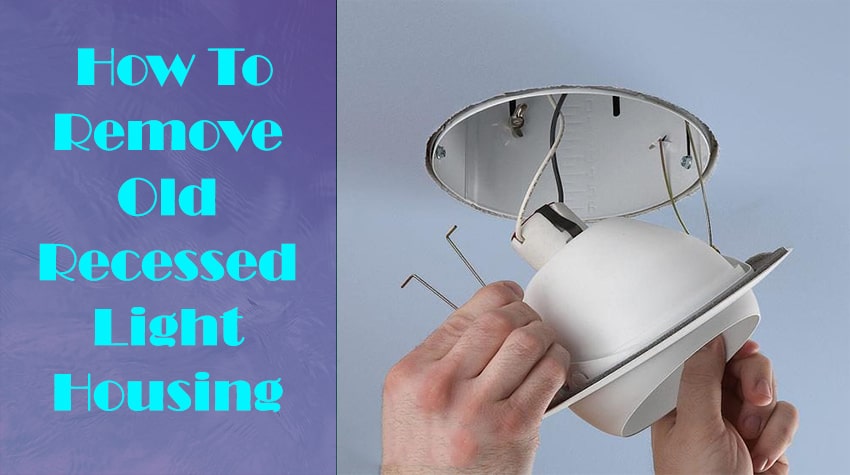
2 Easy Method: How To Remove Old Recessed Light Housing
Recessed lighting is a perfect option to decorate any office, school, commercial space, and home in an amazing way. Nowadays, it is very popular, because, on the one hand, the best recessed lighting gives the long-lasting performance, on the other hand, they provide extraordinary brightness and decoration.
The best part is that the updated recessed lighting comes in various types, such as you can see these lights in different sizes, colors, wattage, designs, so you get the light choosing options as you like. Besides, recessed light installation process and other features are much more accessible.
That’s why many people presently replace the old recessed light and install the new recessed light, But the problem is here, if you are a beginner and do not know the right process, you may have to fight a lot to remove the old recessed light housing.
So in today’s article, we will discuss in detail how to remove old recessed light housing; in this way, you will get a lot of ideas at the beginning stage.
Note: If you are a complete beginner, have no idea about electrical wiring, then we highly recommend that you take the help of a certified electrician in any kind of electrical work.
How To Remove Old Recessed Light Housing
In this section, we will share step-by-step details on how you can remove the old recessed light can. Let’s see.
What you’ll need before starting
- Step Ladder
- Screw Driver Set
- Voltage Detector
Method 1; How To Remove Recessed Light Housing
Step 1: Turn Off the Light
First, turn off the recessed light. Usually, the recessed light stays warm for a while after turning it off, so wait 20 to 30 minutes for it to cool.
Step 2: Turn Off the Breaker.
It is essential to maintain safety in the field of electrical work. Because after switching off sometimes many electrical wires, the electricity is still active. That’s why always turn off the breaker/main switch to start any electrical work.
Step 3: Turning the Light Counterclockwise
If the recessed light is located on the ceiling, then after the light cools down, take the help of a ladder so that you can easily touch the light of the ceiling.
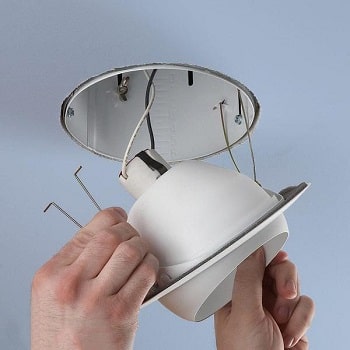
Then try to rotate the bulb safely in a counterclockwise direction; then remove the old trim from the outer ring of the housing, of course, try to turn in such a way that there is no damage.
Step 4: Squeeze the Side Spring Clips
Squeeze the spring clip so that the light is easily removed from the housing. After the light is separated from the housing, you can see the light socket.
Then separate the light from the socket. For safety purposes, touch the wire with a voltage detector to see if electricity is being transmitted.
Step 5: Go to the Inside Ceiling
The most recessed light housing is available in the house attic or inside the ceiling, so you need to go to the attic to safely remove all hidden fixtures and electrical connections and then find all the cans and wiring and fixtures from there.
Remove all insulation and other unnecessary things from around the can. And again, double-check with the voltage detector whether there is any kind of electricity conductor in the cable.
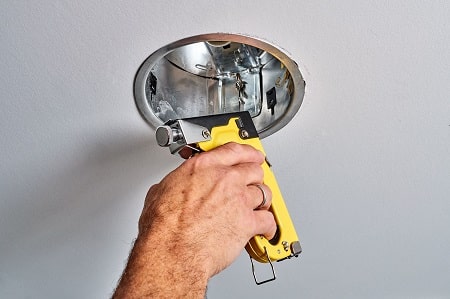
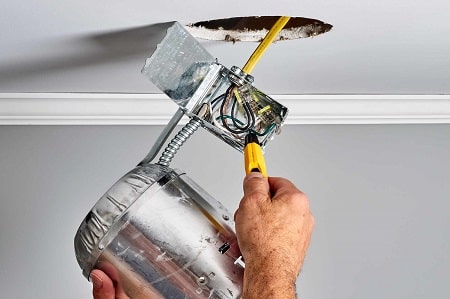
Step 6: Unscrewing the Housing
Then you may see that the cans are installed with a screw around so that it does not move from its position. So with the help of a screwdriver, unscrew all the screws around the can and completely and then separate the housing from the inside ceiling. And using the same method, disconnect all the housing from the ceiling.
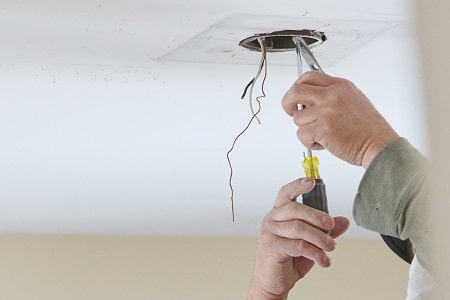
Step 7: Disconnect all Wire
Then you can see the junction box on the side of each can, and if you open the side of the junction box, you can access all the wiring.
Then separate the housing wires from the junction box. In this way, the housing will be easily separated. Using the same method, you can easily separate all the housing.
Method 2; How to Remove Halo Recessed Lighting Trim
The process of removing the halo recessed light is much easier and similar like our previous process, but there are some things to keep in mind, and then you have to move step by step.
Step 1: Turn Off the Light
First, turn off the recessed light. Then wait for 10 to 15 minutes for the light to cool.
Step 2: Turn Off the Breaker
To maintain safety, turn off the breaker/main switch as in the previous process.
Step 3: Slightingly Pull Down the Light and Squeeze the Side Spring Clips
If the halo recessed light is located on the ceiling, take the help of a ladder after the light cools down so that you can easily touch the light of the ceiling. Then remove the old trim from the outer ring of the housing and then try to pull the light by pressing with the help of fingers on both sides of the light.
Then, Squeeze the spring clip so that the light is easily removed from the housing. After the light is separated from the housing, you can see the light socket is connected. Then separate the light from the socket.
Step 4: Go to the Inside Ceiling
To safely disconnect all the hidden fixtures and electrical connections, you have to go inside the ceiling and then find all the cans, wiring, and fixtures from there.
Then extract all insulation and other unnecessary things from around the can. And again, double-check with the voltage detector whether there is any kind of electricity conductor in the cable inside the ceiling.
Step 5: Unscrewing the Housing
Then you may see that the cans are installed with a screw around so that it does not move from its position. So with the help of a screwdriver, unscrew all the screws around the can and completely and then separate the housing from the inside ceiling. And using the same method, disconnect all the housing from the ceiling.
Step 6: Disconnect the Wire
Then you can see the junction box on the side of each can, and if you open the side of the junction box, you can access all the wiring.
Then separate the housing wires from the junction box. In this way, the housing will be easily separated. Using the same method, you can easily separate all the housing.
Also Read:
Final Verdict
Hopefully, in this article, you have found a complete guide on how to remove old recessed light housing. However, we want to tell you again, and if you are a complete beginner, then you must take the help of an electrician, it will save you from a big accident. If you have any questions related to this topic, you can comment below.